I have created this step-by-step, foolproof guide to help beginners start a professional blog without wasting their time on learning HTML and going through lengthy tutorials.
Once you have set up your blog, I will show you how you can bring traffic to your blog and make money out of it.
Excited??? Let’s start.
Step 1: Choose a Blogging Niche
So you have already decided to start a professional blog, this is the time you decide about the kind of content your blog is going to have. If you are really passionate about blogging and want to make the best out of it, you should select your niche wisely.
Already found a blog niche?
You are one step ahead. Jump to next step and read about blogging platform you are going to use.
When people are browsing internet, they are always expecting something interesting and useful which would provide them with the required information. If your blog does not contain what people need, it is sooner or later going to be a waste.
This is why targeted blogs are popular among readers. Put yourself in reader’s shoes. Selecting a niche for blog will help you narrow down your target audience. It will also keep your blog active, interactive and engaged.
Now the question arises, how do I choose my blog niche. Here are few tips you should consider while choosing your blog niche:
Choose something you Love
This is the most important thing to consider while you are choosing your blog niche. It is a good practice to do research and see what is the demand of market but most importantly, you should also know what your heart says. If you are doing something that you are not passionate about, it’s quite possible that you will loose interest very soon. There is a famous quote about it:
Having said that, think of something that you love and are passionate about.
If your blog niche is about what you love:
- You are never going to run out of ideas for your blog posts.
- You will always be happy to spare time to write about something you love.
- You will spare more time for your blog out of your daily routine.
- When you write something with passion, you will probably get more followers on your blog.
Almost 90% of bloggers fail within a week after starting their blog when they realize that this is not the thing they are passionate about.
Finding your passion
There are many ways you can find out your passion. Some of the following questions may help you in making a final decision:
- What are your hobbies?
- What is something you would love to write about?
- What are your interests in technology?
- What is that one work where you could easily spend 3 or 4 hours daily without having any problem?
Apart from these questions, you can also think about the need of market. You have to match your passion with the market demand.
To find out market demand, you can browse internet and find out:
- What are most famous blogs on internet?
- What do these blogs talk about?
- What kind of content people love to read?
- What is trending?
Step 2: Select a Blogging Platform
Before you start thinking so much about the look and feel of you blog, you must first select a blogging platform. There are many blogging platforms currently available in the market. WordPress and Blogger are two of the major blogging platforms. Long story cut short, WordPress is the boss and the following picture shows it all:

Sources show that 74.6 Million sites are built on WordPress which is a huge figure. Even the site you are visiting is powered by WordPress.
Why WordPress is Better than Other Blogging Platforms?
It’s FREE for everyone
- WordPress doesn’t cost a penny to download or install. You will even find a lot of free resources including themes and plugins to make your website look more beautiful with minimal effort.
Extremely Beginner-Friendly
- If you are a layman and have zero technical background, WordPress is the perfect option for you to start your own blog. Having knowledge of Microsoft Word is enough to get you started with your own blog.
It’s Secure
- If giants like BBC, Sony and NASA are using WordPress, there is no doubt about its security infrastructure. WordPress constantly keeps on updating to keep everything safe and sound.
Highly Customizable
- Whether it’s a personal blog, a website for your business or an e-commerce store, WordPress can manage any kind of website.
Mobile-Ready
- The blog or website you create on WordPress is 100% mobile-friendly and adjusts to all screen-sizes including laptops, smartphones, iPad and tablets.
Huge Support Community
- You are not alone if you get stuck in middle of something. 74 million sites are powered by WordPress which means there it’s easy to find help when you need it. You can find a lot of helpful resources on the internet which would help you fix your problems in no time.
And much much more…
There is no other blogging platform that offers you as much freedom as WordPress does. I would strongly recommend WordPress for beginners as no other blogging platform can beat the features and flexibility offered by WordPress.
Step 3: Find a Domain Name and Web Hosting for your Blog
To get your new blog online, you will need the following two things:
- Domain– The web address for your blog e.g. google.com is domain for Google.
- Hosting- An online server where you will place the content of your website/blog.
A domain name and hosting will cost you $3 – $5 a month. It is less than a burger at McDonald’s so it won’t break the bank. But it’s something that matters a lot to your blog’s reputation. And it’s super affordable too.
Why get your own Hosting when there are Free alternatives?
Things that come free are always quite attractive. For example, you can start a free blog on WordPress with a domain name like blogname.wordpress.com but here are the downsides:
1. You will not have your own domain name
Which domain name looks professional?
a) blogname.com
b) blogname.wordpress.com
Off-course, the first one looks more professional and genuine.
2. You will not have an email address with your domain when you are using a free hosted blog
When you have your own domain and hosting, you can easily create as many email addresses as you want. Having an email like yourname@yoursitename.com looks more professional as compared to a Gmail or Yahoo email address.
3. Your blog doesn’t belong to you
You have no control on your free blog. It’s not your property and can get removed any fine morning you wake up in your bed. On the other hand, a blog that is on your own domain and hosting is your property and only you are the one who controls it.
Before you go ahead and register your domain name, you must read this about selecting a good domain name.
How do I select a good domain name
You should keep these things in mind while picking up a domain name for your blog:
Easy to Remember
- It should not be so long that your readers can’t remember it. Neither it should be short and abbreviated that people find it hard to learn. Don’t chose non-sense names like “www.best-tips-on-gardening-from-NY-2016”. Such names would never stay in anyone’s head. Instead, a domain name like “www.gardeningtips.com” is easy to memorize.
Catchy
- Everybody loves words that just roll off the tongue. These are easy to memorize and people don’t forget such words for years. The domain name for you blog should be catchy and grab reader’s attention at first place.
Descriptive
- Your domain name should be descriptive which means that domain name should reflect the content of your blog or website.
But…
Can I use my name for domain name?
YES you can, like I did. It is a great way to start your blog with your own name and you can include the content you like.
Some DONT’S while picking a domain name:
- Avoid crazy extensions like .rocks , .tv, etc.
- Avoid long domain names.
- Avoid words that can cause confusion e.g. techhype.
My Advice- Always go for extension like .com , .org or .net. The most commonly used extension is .com.
Where can I get domain name and hosting for my blog
Well there are a lot of companies offering domain registration and web hosting services but there are these factors to consider before selecting a hosting for your blog:
- Response Time – Time it takes for web page to load completely in your browser
- Up-time – Most of the companies will guarantee a 99.99% up-time. This means you can expect their server to go down for 42 minutes a month which could be a disaster to your blog when you have built up a lot of followers. Therefore, you should always aim for more than it.
Therefore, I would highly recommend BlueHost for registering your domain and hosting your blog.
Why BlueHost
- FREE Domain Name
- Easy to use for beginners
- 1-click install for WordPress
- Super fast and reliable
Visitors on this blog will get a FREE Domain Name, so this is a chance for you to save more money by signing up with BlueHost.
Alternative Hosting Plans
- A Small Orange – Blazing Fast WordPress Hosting + Excellent Customer Support
- Siteground – Famous mainly because of Best Customer Support
Note: I now personally use and recommend SiteGround only. If you plan to go with SiteGround, just complete your purchase and continue from Step 4. I am available for FREE consultation. If you face any problem during setup, feel free to drop me a line using this contact form.
Now here begins the exciting part.
1. Go to www.BlueHost.com and click “Get Started Now”. If you use this link, you are entitled to a FREE Domain which will save you another $12.

2. Select the “basic” plan from the next screen. It gives you 5 email accounts and 50 GB storage which is more than enough for you to keep going for next 5-6 years.

3. Type the domain name you want to register. If you already have a domain name, you can type your domain name on the right side. Click “Next”.

4. Complete your “account information” on the next screen.

5. Select your hosting package.
You can either signup for 12 months, 24 months or 36 months plan depending on your budget. If you pay for 3 years, you will get a lower rate as compared to the other packages. I would suggest you to go for 12 months plan if you are a beginner, and you can always upgrade easily.
You will see some extras as well:
Domain Privacy Protection: It protects your information from WHOIS- a publicly accessible database which contains your registration information against your domain name. You can check this option if you want to stay anonymous.
You can un-check all other boxes as you don’t need them at this moment. Now your total domain costs fall around $60 for an year which is not bad at all.

6. Scroll down to Payment section. Complete payment details to checkout.
You can either pay with credit card or PayPal. If you want to pay with PayPal, click the “More Payment Options” link.

7. You will shortly receive an email from BlueHost. Login to your hosting account with your credentials.
8. Go to control panel. Find “Install WordPress” icon under “Websites” section.

9. Click “Install”.

10. Select the domain name where you want to install WordPress. Leave the “path” blank if you want to install WordPress in root directory.

11. If you see the error “It looks like files already exist in location”, just hit “Continue” to complete installation.

12. Done. You have just installed WordPress on your brand new domain. It will give you credentials that you will use to login to WordPress.

Step 4: Configure and Design your WordPress Blog
This is the final step and most exciting step of this guide. Your blog is setup and may browse your blog and see how it looks. A default theme is automatically applied when you install WordPress. Here is what you will learn in this final step:
- Understanding WordPress Dashboard
- Changing the look and feel of your blog
- Adding widgets and plugins to your blog
- Optimizing your blog for search engine
- Managing Users
Once you have successfully installed WordPress on your domain, you can login to WordPress using the login credentials provided at the end of installation. You will see the following Dashboard once you are logged in for the first time:

Ignore any extra items in the above screenshot you are not seeing on your “Dashboard“.
Getting Familiar With Some Basic (but important) Stuff
- Media– This is where you will keep your images, videos and other resources.
- Pages– This is where you can add new pages to your blog e.g. “About” page or “Contact” page. You can also make changes to existing pages here.
- Posts– You can create or edit a blog post here. A blog post is different than a page in a sense that page has specific layout whereas blog post is inside a page. You can also manage “Categories” under “Posts” section. Categories help you organize your content on the blog.
- Comments– This allows you to moderate comments on your blog posts. You can review the comments awaiting approval, comments that have been approved, comments that have been rejected and comments that have been marked as spam. You can also delete a comment here.
- Appearance– This is an important section where you can change the look and feel of your blog. You can apply a new theme, customize an existing theme or add features to your pages and sidebars. You can also manage the “Menus” here. Keep reading and I will talk about this section in detail.
- Plugins– This is an amazing thing which would let you add features to your WordPress blog. You can use a plugin for creating contact form, a social plugin allowing user to share your blog posts, or a plugin to perform Search Engine Optimization on your blog.
- Users– You can manage your blog users here. WordPress allows you to add users with various roles to contribute to your blog. For example if you want to give someone access to write blog posts on your blog, you can create an “Author” account for them.
- Settings– General settings and configuration of your blog including reading, writing and permalinks.
How can I change theme of my WordPress Blog?
You can modify the appearance of your blog by navigating to “Appearance” section.
1. Click on Appearance.

2. Select a new theme you want to apply on your blog. You can also preview a theme before applying it by clicking on “Live Preview” button.
3. To customize a theme, click “Customize“.

4. You will see different customization options for different themes. You can change the “Site Title” and “Tagline” here. You can also select a static landing page for you blog.
- Thrive Themes
- Elegant Themes (Best value for money- 87 Themes for the price of 1)
- MyThemeShop
How can I add a new Page?
You can add/remove a page from your blog by following these instructions:
1. Select “Pages” from the left navigation panel. Click on “Add New” button.

2. Enter Page Title and content of the page. Select a page template from right. Click “Publish” to make it live for public. You can also save page as draft if you want to publish later. To save only, Click “Save Draft” button.

Writing your First Blog Post
Publishing a new post on your blog is easy. Here is how you can publish your first blog post:
1. Select “Posts” from left”. Click “Add New”.

2. Write title and content of your blog post.

To add a Hyperlink:
1. Select the text you want to link. click “Insert/Edit link” button from the toolbar.

2. You can either link to your own blog posts or to another website on the internet. Check mark the option “Open link in a new window” if you want the link to open in a separate tab.

To add images to post:
1. Click “Add Media” button.

2. Select the images from Library. You can also upload new images and insert image from URL as well.

To format text of blog post:
1. You can use these simple formatting tools to style your blog posts.

How do I Add/Remove links from the navigation bar?
You can easily manage menu items by following these steps:
1. Mouse over “Appearance” on the left panel and Click “Menu”.

2. To create a new menu, Click on “create a new menu” link on top. To add a link to an existing menu, select the type of link you want to add and then click “Add to menu” button. You can create a menu button for posts, pages, categories and even custom links.

Optimizing your blog URL’s for Search Engines
Search engines really like URL’s that are meaningful. Having random numbers in the URL of your blog post or page looks ugly and not so professional. You can configure permalinks of your blog by following these steps:
1. Mouse over to “Settings” and click on “Permalinks”.
2. Select a URL format for your pages and blog posts. I would prefer the 5th one i.e. post title appended at the end of your domain.

Managing Users on your WordPress Blog
You can add/edit/delete users on your blog. You can also change your own password and user information in the “Users” Section.
1. To add a new user, click on the “Add New” button.

2. Enter User details and Select a Role for the new User.

3. There are 5 types of roles you can assign to a user:
- Subscriber– Can only manage their profiles e.g. update name and email address.
- Contributor– Can write and manage their posts but cannot publish them.
- Author– Can write and manage their posts and publish as well.
- Editor– Can write and manage their own posts as well as the posts from other authors.
- Administrator– No Limits.
Installing Plugins
You can install different plugins to add different features to your blog to make it look more professional. Plugins will really make your life easy.
To find and install a plugin, follow these steps:
1. Select “Plugins” from left sidebar and click “Add New”.

2. Find the plugin you want to install. For example, you need a plugin to create contact form. Type search string in the search box and hit enter. You shall see something like this.
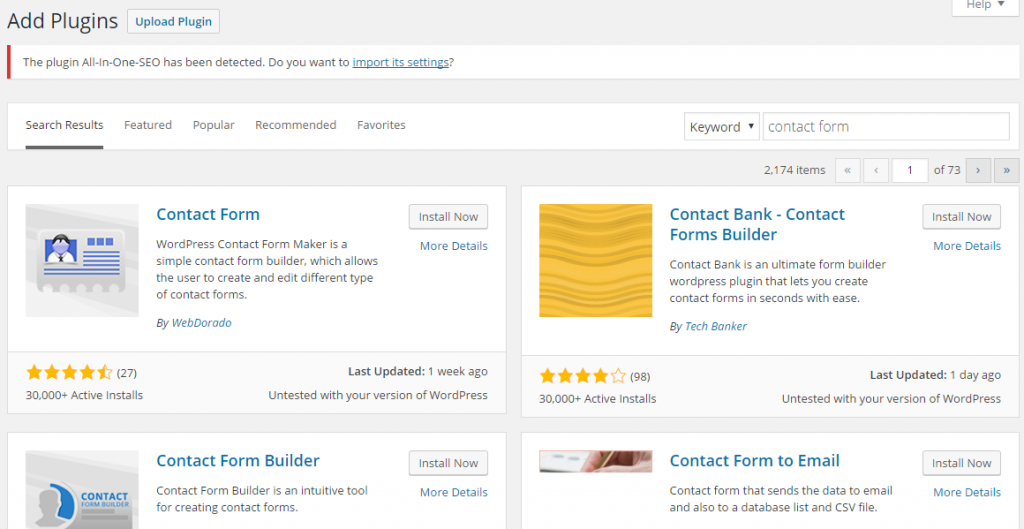
3. Click “Install Now” on the plugin you want to install. Once installed, you will be asked to activate the plugin. Click “Activate Plugin” to start using it.

What Next?
Now that you have successfully created your WordPress blog, it’s time to move on. You just took the first step to your blogging journey.
Meanwhile if you need help with anything, feel free to drop me a line and I will get back to you as soon as possible. I love talking to people and responding their queries.
Sharing is Caring
Last but not the least, if you find this guide useful, don’t forget to share it with your friends and colleagues so that maximum people could benefit from it.
Thank you so much Aqib, it was so helpfull, detailed and interesting.
Good one. It’s a good start up guide for newbies to blogging. Those who have no prior experience. Very detailed and easy to follow along.
Related: http://www.amazinglifedaily.com/writing-great-blog-posts/
I actually started another blog in wordpress and I highly recommend it because of its graphics and visuals. I am having trouble though with domain and hosting because I can’t afford maintenance, yet being a student. But I will surely come back to this once I get my own website done. This is really helpful for me!
xx
Now this post is really a good guide for newbies and even those who are planning to migrate from other platforms to WP. Mine is hosted under WP and I deifnitely agree that WP is one of the best so far and convenient too!
This is very helpful information. I wish I had it before I started my blog on Blogger. I had to transfer to WordPress later and that was such a pain! But WordPress is so much easier to use than Blogger. I’m glad I made the change. And I like Blue Host too!
I am glad you switched to WP. Better late than never.
Seeing what I mainly use for my blog being written here as part of a professional setup makes me feel great. I’m no pro myself, of course, but I have to agree with a lot of things here including picking a long-term niche and flavor. There are people who would think of 50 things to write about, but they all don’t have a common denominator to flourish more. And WordPress! I love the whole system and tool diversity. It’s really efficient as well.
Comprehensive guide! Good job! I have just migrated my blog to wordpress via bluehost a few months ago and glad to know that I did everything in this guide. 🙂 Thanks for sharing!
I’m so happy to have WordPress from beginning. This looks hard but with your guide much easier. Good article that a lot of blogger will appreciate! Time to make your comment area perfectly working always and I can comment you even easier and often 🙂 xo
http://www.sofarsosabine.com
I started blogging since 2007 and during my early years in blogging, i embraced the free Blogger (blogspot) platform because of their simple and easily manageable blogging features but eventually, when I started to buy my own domains, i ventured to WordPress as my main platform and I’m still loving it today… WordPress themes and plugins are more professional looking in my opinion
thanks for this guide
This is such an interesting post, I have been thinking about going self hosted for a long time and jisy haven’t taken the leap yet. The reason being everything seems so complicated but your post is really helpful and easy to read so I will be coming back in the future when I do go self hosted.
This is an amazing guide! I just wouldn’t recommend bluehost. They can have lots of problems. But I wish I read your guide when I was creating mind.
Very detailed guide. Love the phrases of choose what you love. Blogging is full of techinicalities but above all – passion. 🙂
Approval
I’m a beginner in this field and want to know about blogging , which platform should i start like blogger or WordPress. I think blogger does not rank better then WordPress plz guide me. I am a software engineer and i want to start my career in this field for sharing knowledge or technical skills.
I’d recommend you go with WordPress. It’s beginner-friendly and scalable too.
Aqib with your experience in niche marketing after consideration of all the aspects of design, look, user experience, speed, and conversion which WordPress theme will you recommend to the user for my niche site. Please mention few if you cannot be fixed with only one. Thanks.
I personally use Schema or Focus Blog.